Notice
Recent Posts
Recent Comments
Link
| 일 | 월 | 화 | 수 | 목 | 금 | 토 |
|---|---|---|---|---|---|---|
| 1 | 2 | 3 | 4 | 5 | 6 | 7 |
| 8 | 9 | 10 | 11 | 12 | 13 | 14 |
| 15 | 16 | 17 | 18 | 19 | 20 | 21 |
| 22 | 23 | 24 | 25 | 26 | 27 | 28 |
Tags
- mongoose
- MongoDB
- nestjs
- nodejs
- AWS
- 자료구조
- 정렬
- react
- MySQL
- JavaScript
- Nest.js
- flask
- typeORM
- Python
- 게임
- Express
- class
- Bull
- TypeScript
- cookie
- 공룡게임
- Sequelize
- Dinosaur
- OCR
- dfs
- game
- GIT
- jest
- Queue
Archives
- Today
- Total
포시코딩
[Sequelize] 세팅 및 사용방법 본문
728x90
Sequelize란?
Node.js의 대표적인 ORM인 Sequelize는 MySQL, PostgreSQL, MariaDB 등 많은 RDBMS를 지원하고
Promise 기반으로 구현되었기 때문에 비동기 로직을 편리하게 작성할 수 있다.
MongoDB 사용할 때 Mongoose를 사용해봤다면 이해하기 쉬울것이다.
설치 및 세팅
DB 생성
npm i sequelize mysql2
npm i sequelize-cli -D
npx sequelize init설치하면 아래와 같은 폴더구조가 생긴다.
내 프로젝트 폴더 이름
├── models
│   └── index.js
├── config
│   └── config.json
├── migrations
├── seeders
├── package-lock.json
└── package.json- /models/index.js: 구현할 sequelize 모델을 편리하게 사용할 수 있게 해주는 파일
- /config/config.json: 데이터베이스에 연결하기 위한 설정 데이터가 JSON 형식으로 들어가있다.
/confit/config.json파일에 들어가 dev 항목의 password와 host를 설정해준다.

그 후 아래 코드를 터미널에 입력하면
npx sequelize db:createdatabase_development라는 이름으로 db가 생성된다.

test, production으로 생성하고 싶다면 아래처럼 하면 된다.
NODE_ENV=test npx sequelize db:create
NODE_ENV=production npx sequelize db:create
모델 생성
npx sequelize model:generate --name User --attributes email:string,nickname:string,password:string
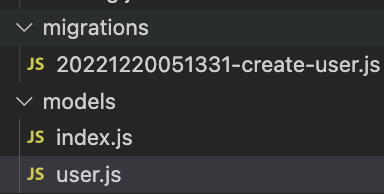
터미널에 위 명령어를 입력하게되면 migrations, models 폴더에 각각 user 관련 파일이 생성된다.


- /migrations/user.js: 실제 데이터베이스 안의 user 정보
- /models/user.js: Express에서 Sequelize를 통해 사용할 user 정보
모델 수정
자동으로 만들어준 id 대신 userId로 바꿔 사용해야 한다면 아래와 같이 수정해준다.
// (/models/user.js)

// ...생략
  // User.init({
  //   email: DataTypes.STRING,
  //   nickname: DataTypes.STRING,
  //   password: DataTypes.STRING
  // }, {
    User.init({
      userId: {
        primaryKey: true,
        type: DataTypes.INTEGER,
      },
      email: DataTypes.STRING,
      nickname: DataTypes.STRING,
      password: DataTypes.STRING
    }, {
// ...생략
// (/migrations/user.js)
// ...생략
await queryInterface.createTable('Users', {
// id: {
userId: {
allowNull: false,
autoIncrement: true,
primaryKey: true,
type: Sequelize.INTEGER
},
// ...생략
테이블 생성
npx sequelize db:migrate

정상적으로 migration 파일을 통해서 table을 생성한 것을 볼 수 있다.
사용법
사용자 모델 불러오기
const { User } = require('./models');/models/index.js 파일이 데이터베이스 연결 설정과 함께 Sequelize 모델 파일을 불러와서 다시 내보내주기 때문에
위의 코드처럼 사용자 모델을 사용해야 한다.
회원가입 예시
const { Op } = require('sequelize');
const { User } = require('./models');

// 회원가입
router.post('/users', async (req, res) => {
  const { nickname, email, password, confirmPassword } = req.body;

  if (password !== confirmPassword) {
    res.status(400).json({
      errorMessage: "패스워드가 패스워드 확인란과 일치하지 않습니다."
    });
    return;
  }

  const existUser = await User.findAll({
    where: {
      [Op.or]: [{ email }, { nickname }]
    },
  });

  if (existUser.length) {
    res.status(400).json({
      errorMessage: "Email이나 Nickname이 이미 사용중입니다."
    });
    return;
  }

  await User.create({ nickname, email, password });
  res.status(201).send({});
});
728x90
'Node.js' 카테고리의 다른 글
| [bcrypt] Error: Invalid salt. Salt must be in the form of: $Vers$log2(NumRounds)$saltvalue (0) | 2022.12.21 |
|---|---|
| [Sequelize] config.json에 dotenv 환경변수 사용하기 - 작성중 (0) | 2022.12.20 |
| 미들웨어(Middleware) (0) | 2022.12.19 |
| Access Token, Refresh Token (0) | 2022.12.19 |
| JWT (0) | 2022.12.19 |


