| 일 | 월 | 화 | 수 | 목 | 금 | 토 |
|---|---|---|---|---|---|---|
| 1 | 2 | 3 | ||||
| 4 | 5 | 6 | 7 | 8 | 9 | 10 |
| 11 | 12 | 13 | 14 | 15 | 16 | 17 |
| 18 | 19 | 20 | 21 | 22 | 23 | 24 |
| 25 | 26 | 27 | 28 | 29 | 30 | 31 |
- MongoDB
- react
- 공룡게임
- AWS
- OCR
- Bull
- GIT
- MySQL
- 자료구조
- Python
- 정렬
- TypeScript
- 게임
- dfs
- Nest.js
- nestjs
- nodejs
- Dinosaur
- flask
- typeORM
- Sequelize
- Express
- cookie
- jest
- mongoose
- JavaScript
- game
- class
- Queue
- Today
- Total
포시코딩
Google OAuth2 - 구글 로그인 with React, Vue (2022 ver) - Vue(2) 본문
이전 포스팅(Google OAuth2 - 구글 로그인 with React, Vue (2022 ver) - Vue(1)) 참고
jwt 해석을 위해 모듈 하나를 받아주자
npm install vue-jwt-decodeReact에서는 jwt-decode를 통해 사용 가능하고
Vue에서는 vue-jwt-decode를 통해 사용 가능하다.
두 모듈 다 사용하지 않고도 jwt를 해석할 수 있는데,
parseJwt(token) {
    var base64Url = token.split('.')[1];
    var base64 = base64Url.replace(/-/g, '+').replace(/_/g, '/');
    var jsonPayload = decodeURIComponent(window.atob(base64).split('').map(function(c) {
      return '%' + ('00' + c.charCodeAt(0).toString(16)).slice(-2);
    }).join(''));
    return JSON.parse(jsonPayload);
}
이런식으로 함수를 직접 만들어 사용할 수도 있다. 나는 한줄이면 끝나는 모듈을 설치해서 쓰기로 함.
import 후 이전 포스팅에서 만든 함수에 아래처럼 코드 추가
import VueJwtDecode from 'vue-jwt-decode'handleCallbackResponse(res){
console.log('Encoded JWT ID token: ' + res.credential);
let userObject = VueJwtDecode.decode(res.credential);
console.log(userObject);
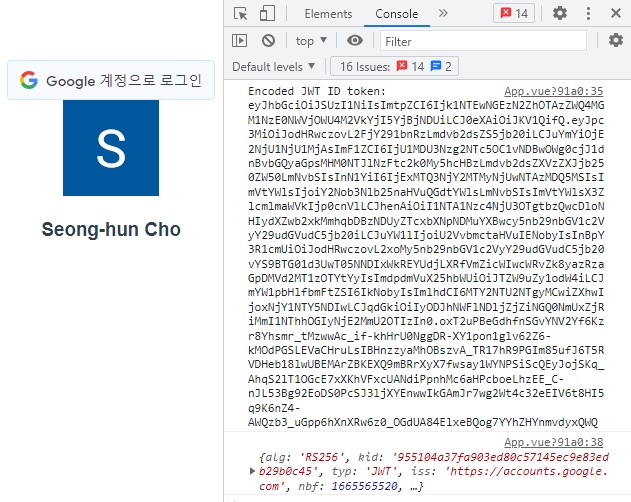
},저장 후 로그인해서 콘솔을 확인해보면

디코딩된 데이터 정보가 오브젝트 형태로 출력되는걸 볼 수 있다.
data(){
  return {
    user: {},
  }
},
data에서 user 선언 해준 뒤
handleCallbackResponse(res){
    console.log('Encoded JWT ID token: ' + res.credential);

    let userObject = VueJwtDecode.decode(res.credential);
    console.log(userObject);
    this.user = userObject;
}
jwt 디코딩 결과를 user에 담아준 후
<div v-if="user">
    <img :src="user.picture" />
    <h3>{{user.name}}</h3>
</div>
user에서 프로필 사진과 이름을 뽑아쓰면 아래처럼 로그인 된 유저 정보를 나타낼 수 있다.

여기에 로그아웃 기능과 로그인 시 구글 로그인 버튼까지 사라졌다
로그아웃할 때 나타내는 기능까지 추가한다면 전체 코드는 아래와 같다.
<template>
  <div>
    <div id='G_OAuth_btn'></div>
    <button v-if="Object.keys(user).length != 0" @click="handleSignOut">Sign Out</button>
    <div v-if="user">
        <img :src="user.picture" />
        <h3>{{user.name}}</h3>
    </div>
  </div>
</template>

<script>
import VueJwtDecode from 'vue-jwt-decode'

export default {
  name: 'App',
  data(){
    return {
      user: {},
    }
  },
  mounted(){
    let google = window.google;
    google.accounts.id.initialize({
      client_id: '550577865798-o40p9h4r2uvpold2hjl0s452e71msi43.apps.googleusercontent.com',
      callback: this.handleCallbackResponse
    })
    google.accounts.id.renderButton(
      document.getElementById('G_OAuth_btn'),
      { theme: 'outline', size: 'large' }
    )
  },
  methods: {
    handleCallbackResponse(res){
      console.log('Encoded JWT ID token: ' + res.credential);

      let userObject = VueJwtDecode.decode(res.credential);
      console.log(userObject);
      this.user = userObject;
      document.querySelector('#G_OAuth_btn').hidden = true;

    },
    handleSignOut(){
      this.user = {};
      document.querySelector('#G_OAuth_btn').hidden = false;
    }
  }
}
</script>

<style>
</style>
구글 유저 데이터를 가져올 수 있으니 나머지 로그인 과정에 대해선
알아서 구현해보시기 바란다.
전체적으로 React에서 구현했던 기능들을 Vue에서 작동하게 그대로 가져온거라
시크릿 모드에서 밖에 안되는 부분도 그렇고 부족한게 있는 것 같다.
해당 과정은 아래 샘플 프로젝트를 통해 확인 가능하다.
https://github.com/cchoseonghun/Vue_Google_OAuth2_Sample
GitHub - cchoseonghun/Vue_Google_OAuth2_Sample
Contribute to cchoseonghun/Vue_Google_OAuth2_Sample development by creating an account on GitHub.
github.com
'OAuth' 카테고리의 다른 글
| Google OAuth2 - 구글 로그인 with React, Vue (2022 ver) - Vue(1) (0) | 2022.10.12 |
|---|---|
| Google OAuth2 - 구글 로그인 with React, Vue (2022 ver) - React(2) (0) | 2022.10.10 |
| Google OAuth2 - 구글 로그인 with React, Vue (2022 ver) - React(1) (0) | 2022.10.10 |
| Google OAuth2 - 구글 로그인 with React, Vue (2022 ver) - GCP 세팅 (0) | 2022.10.10 |


